In this post
A transformation is a change in the size or position of an object in relation to something, usually a square background. There are many different kinds of transformations and more than one of these can be used on the same object. Here we will give a brief description of the main types of transformations.
Translation
A translation is a movement of an object in a straight line. This can obviously be up, down, left or right, and a translation written mathematically is as a column vector. These are in the form ![]() . The number on the top (x) is the left and right movement, with a positive move to the right and negative to the left. The number at the bottom (y) tells the number an object is moved up or down by, with a positive moving the object up and a negative moving it down.
. The number on the top (x) is the left and right movement, with a positive move to the right and negative to the left. The number at the bottom (y) tells the number an object is moved up or down by, with a positive moving the object up and a negative moving it down.
Here is a picture of a square that has been moved 6 squares to the right and 3 down. The column vector for this translation is ![]()

Any movement of an object can be put as a column vector. Its inverse can also be found; this is the column vector which would take the shape back to its original position. Therefore, we must simply reverse the signs for the numbers in the column vector so that the shape will be moved back to where it started. So, to find the inverse of any column vectors we must simply change the positives to negatives and vice versa.
Example
Find the inverse of the column vector ![]() .
.
To do this we must simply reverse the signs of the vector to give us the inverse which is ![]() .
.
Enlargement
An enlargement is where we need to change the size of a shape by a certain amount. The new object will therefore be similar (this means that they have the same angles and sides but are just different sizes). The lengths of each side are multiplied by what is called a ‘scale factor’ to get the new shape. As well as this we need the ‘centre of enlargement’ so that we know where the enlargement is done in relation to.
To carry out an enlargement we need:
1) The scale factor
2) The centre of enlargement
Below is an example of an enlargement with a scale factor of 2 and the dot as the centre of enlargement.

To find the enlarged shape you need to follow these instructions:
1) Draw and measure a line from the centre of enlargement to a vertex of the original shape.
2) Multiply this length by the scale factor.
3) Draw a new vertex this distance from the centre of enlargement in the same direction as the original line.
4) Repeat for each vertex and then join up all the new vertices to create a new enlarged shape.
This new shape which we now have is called the image of the original after an enlargement. We do not always enlarge a shape so that the image is larger than the original. A scale factor that is between 0 and 1 would result in an image that is smaller than the original shape.
A good rule to remember is that if the centre of enlargement is at the points where the x and y axes meet, the point (0,0), then to find the coordinate points of the image we can simply multiply the original shape’s coordinates by the scale factor. For example, a point at (-4,3) enlarged with a scale factor 3 would have its corresponding point at (-12,9).
Example
If you enlarge a triangle with points (12,6), (-10,2) and (6,-4) with a scale factor of 2.5 about the origin (0,0), what would be the new coordinates of the triangle’s image?
Since we are enlarging about (0,0) we can simply multiply each of the coordinates by the scale factor to give us the new points of the triangle’s image. These would be (30,15), (-25,5) and (15,-10).
Rotation
A rotation turns a shape about a fixed point by a certain number of degrees. To describe a rotation we need to have three things:
1) A centre of rotation
2) The angle turned through
3) Whether the rotation is clockwise or anticlockwise (the direction)
To successfully rotate a shape it is best to draw a line from the centre of rotation to each of the vertices and then draw a line that is the same length but the correct angle and direction from the original. At the tip of this line is the new point of our shape’s image.
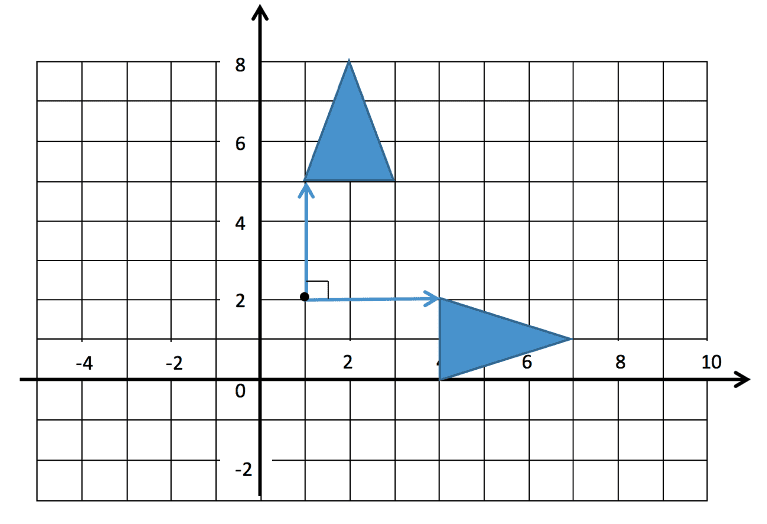
The diagram above shows the rotation of ![]() in the clockwise direction about the point (1,2). To find the inverse of a rotation we must simply swap the direction, so for the example above the inverse of a clockwise rotation is anticlockwise. Every other part of the rotation is kept the same (the angle and centre of rotation).
in the clockwise direction about the point (1,2). To find the inverse of a rotation we must simply swap the direction, so for the example above the inverse of a clockwise rotation is anticlockwise. Every other part of the rotation is kept the same (the angle and centre of rotation).
Example
Rotate the following shape by ![]() about the point (2,2) in an anticlockwise direction.
about the point (2,2) in an anticlockwise direction.
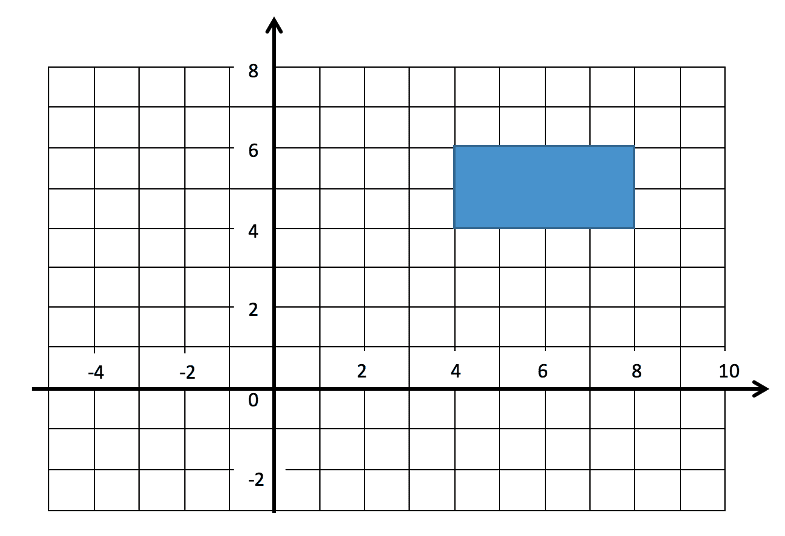
To do this we must draw on the centre of rotation (2,2) and then draw a line from each vertex to this, then a line of equal length that is ![]() in the anticlockwise direction. This is shown below with annotations.
in the anticlockwise direction. This is shown below with annotations.

Reflections
When reflecting an object we must have a ‘mirror line’ so that the original can be reflected. The new image of the original will be exactly the same distance from this line as the shape we were given originally.

Above shows an image A which is reflected in the line ![]() (the blue line) to give an image of shape B. As you can see, each point of the original A is reflected and the distance between the point and the mirror line is exactly the same as the distance from the mirror line to the corresponding point on the new image B.
(the blue line) to give an image of shape B. As you can see, each point of the original A is reflected and the distance between the point and the mirror line is exactly the same as the distance from the mirror line to the corresponding point on the new image B.
To describe a reflection we must simply state the mirror line’s position. The steps for carrying out a reflection are as follows:
1) Draw a line from any point of the original to the mirror line at ![]() .
.
2) Measure this distance from the point to the line and measure the same distance on the opposite side of the mirror line and place a point here. This is the corresponding point in the shape’s reflected image.
3) Repeat for all vertices.
To carry out reflections you must be able to recognise and draw lines from the equation given for them. Say we have the line ![]() , this tells us that we must have a line that joins all of the coordinates that have an x value of 3. An easy way to remember this is to know that equations that refer to the value are vertical and pass through the number quoted on the axis. Equations that refer to the y value go horizontally and again pass through the correct value on the axis. Another line to remember is
, this tells us that we must have a line that joins all of the coordinates that have an x value of 3. An easy way to remember this is to know that equations that refer to the value are vertical and pass through the number quoted on the axis. Equations that refer to the y value go horizontally and again pass through the correct value on the axis. Another line to remember is ![]() which is a horizontal line at
which is a horizontal line at ![]() .
.
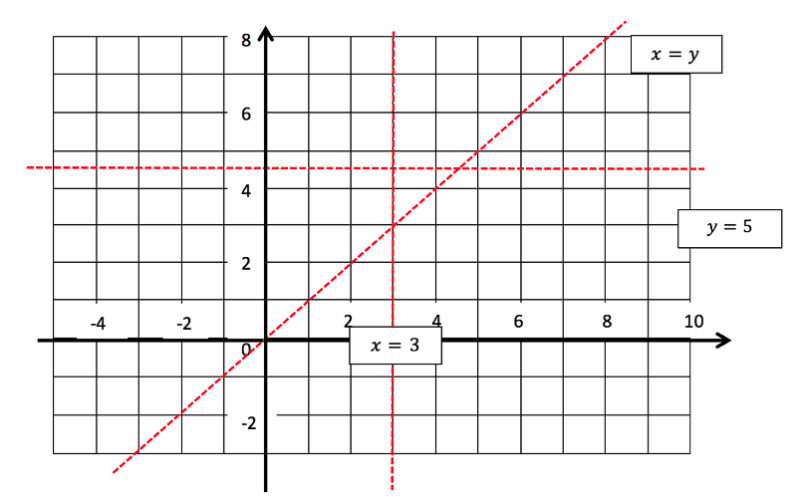
Shapes can also be reflected in the x or y axis and are the same as reflecting with the line ![]() and
and ![]() .
.
Example
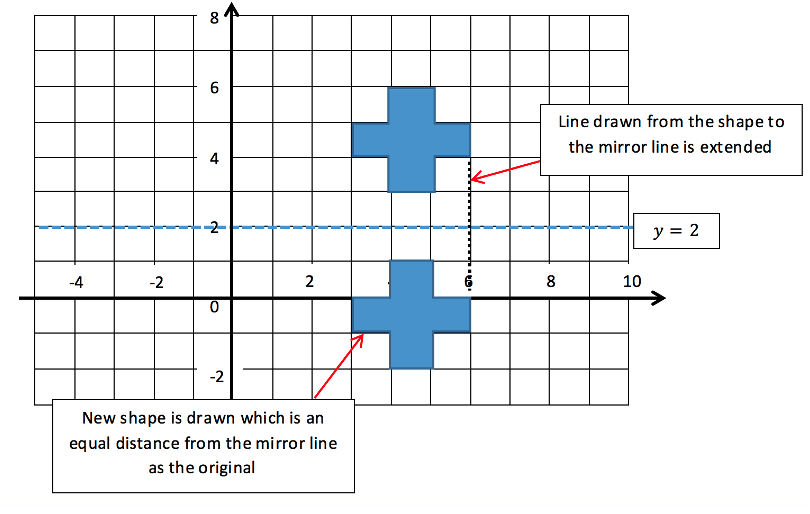
Reflect the shape below in the line ![]() .
.
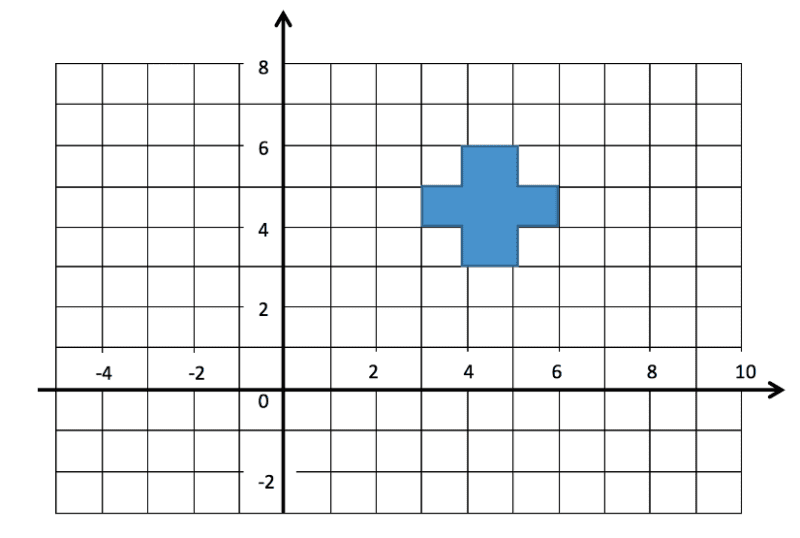
To solve this we must draw in the mirror line and then draw the image which will be the exact same distance from this line as the original. This is shown below.
Example
Reflect the shape below in the line ![]() .
.
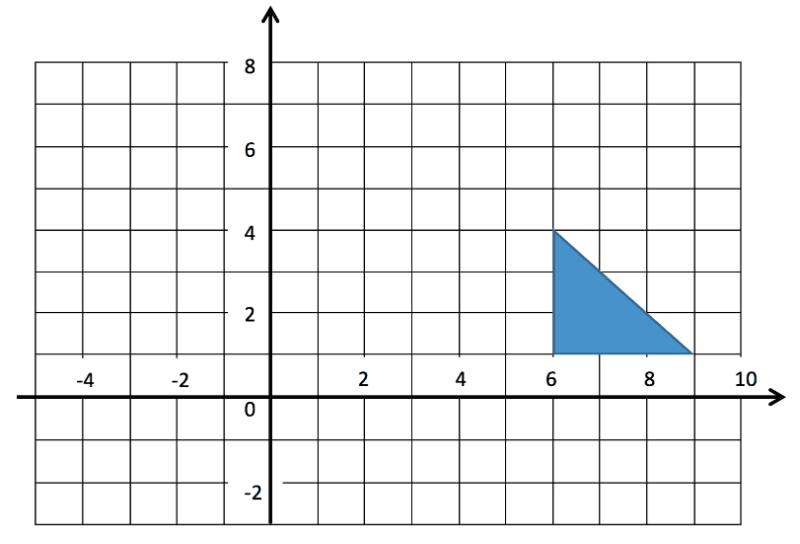
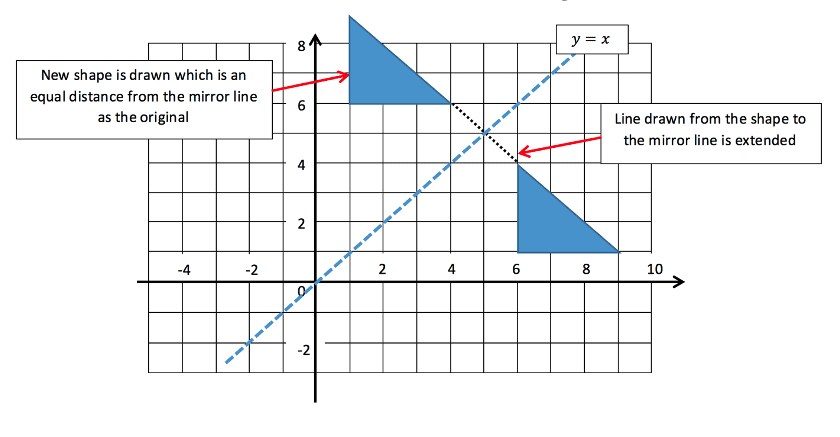
To solve this we must draw in the mirror line and then draw the image which will be the exact same distance from this line as the original. This is shown below.
Combined transformations
Sometimes we will be asked to perform more than one transformation on a shape, which should not be attempted all in one go! Instead you must perform the transformations one at a time and use the new image that was found from the previous to determine the next result.
Transformations should be done in the correct order that is stated in the question; not doing this may lead to an answer that is incorrect.
Example
The triangle A is shown below. Do the following transformations to A:
1) Translate the triangle with the column vector ![]() . Call the new triangle
. Call the new triangle ![]()
2) Reflect ![]() in the line
in the line ![]() . Call the result
. Call the result ![]()
3) Rotate ![]() anticlockwise
anticlockwise ![]() about the point (3,0). Call the new triangle
about the point (3,0). Call the new triangle ![]()
4) Finally, enlarge ![]() with a scale factor 2 about the point (6,0)
with a scale factor 2 about the point (6,0)
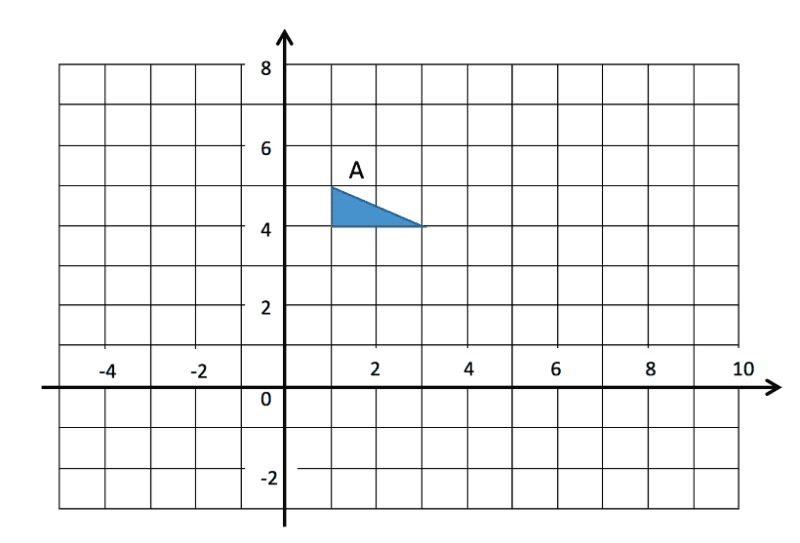
1) First we must start with the translation ![]() which tells us to move the triangle
which tells us to move the triangle ![]() 3 squares to the right and 1 square down. This is fairly simple to implement and the new triangle in this position is given the name
3 squares to the right and 1 square down. This is fairly simple to implement and the new triangle in this position is given the name ![]() . This is shown below on the diagram.
. This is shown below on the diagram.
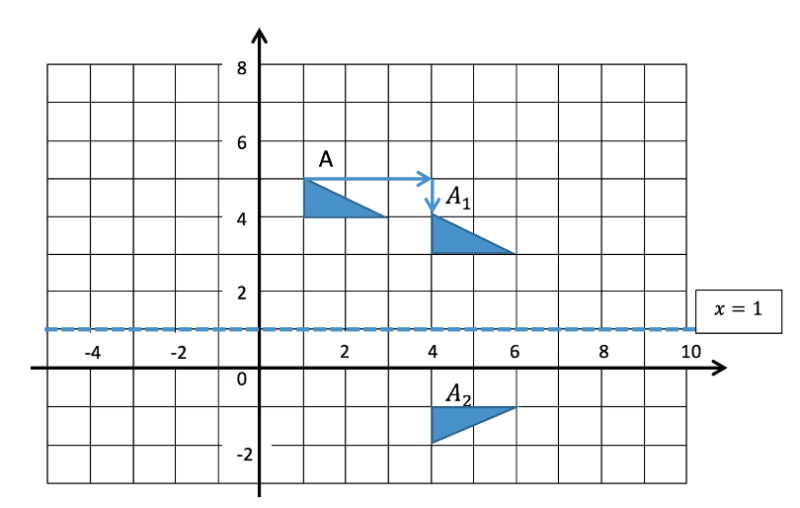
2) Now we reflect the triangle ![]() in the line given by the equation
in the line given by the equation ![]() . This is shown in the diagram above and the usual rules of reflection apply.
. This is shown in the diagram above and the usual rules of reflection apply.
3) Next we must take the triangle that we labelled ![]() and rotate it anticlockwise
and rotate it anticlockwise ![]() about the point (3,0). Again, the usual rules of rotation that we have already looked at still apply and the rotation is only done on triangle
about the point (3,0). Again, the usual rules of rotation that we have already looked at still apply and the rotation is only done on triangle ![]() . This step is shown on the next diagram.
. This step is shown on the next diagram.

4) Finally, we need to enlarge triangle ![]() about the point (6,0) with a scale factor of 2. This is shown above in the diagram.
about the point (6,0) with a scale factor of 2. This is shown above in the diagram.
Now we have successfully done multiple transformations that have been broken down into smaller steps to make it easier for us.


